A blog by an historian, Pagan and fanfiction writer, with left-wing leaning politics. In short, I could be waffling on about anything.
Showing posts with label Gaming. Show all posts

Monday, 12 December 2011

Part 6: Using Macros to Streamline your Runescape Excel Hiscores Tracker

Welcome to part six of my guide on using Excel to track your Runescape Hiscores. We've already created three tables, which record daily XP, work out your XP to the next level and determine your overall averages. This time, we will be running some macros to make them even more convenient to consult.


Please note that once you add macros into the equation, you will need to save your Excel workbook in a different mode. You'll be prompted to do this when you come to save it anyway, but the correct filename is: Excel Macro-Enabled.

Runescape Excel Hiscores Tracker: The Story So Far

This guide is written in the assumption that your workbook looks exactly like mine. For that to be the case, then you will have had to follow the previous entries. All of the data referred to and the tables created are outlined in them.

I've been asked if this could be used for other on-line games too. Yes! As long as the hiscores of that game are on a website somewhere, you can use the techniques in this guide to create a tracker for those too. If you encounter any difficulties in creating a World of Warcraft Excel Hiscores Tracker or whatever, then just comment here and I'll see what I can do to help.

Part 1: How to Make a Runescape Hiscores Tracker in Microsoft Office Excel - Collecting data ready to feed your tables and charts.

Part 2: Averages Table in your Runescape Excel Hiscores Tracker - Creating the first table, which worked out your XP averages from highest to lowest skill. There was also a bonus section answering some formatting questions, mostly from those new to Excel.

Part 3: Calculating XP to Next Level in your Runescape Excel Hiscores Tracker - Creating a table to calculate the XP needed until your next level.

Part 4: Adding Activity Logs and More to your Runescape Excel Hiscores Tracker - Using the contents of websites to add data into Excel, notably a couple of ways to add your Runescape Activity Logs.

Part 5: Tracking Daily XP in your Runescape Excel Hiscores Tracker - Letting Excel calculate how much XP you had gained in Runescape today, as well as recording the levels gained and your rank changes.

But many of these tables are currently being sorted by hand. Let's change all of that by inserting a few macros!

Adding Macros to your Excel Runescape Hiscores Tracker

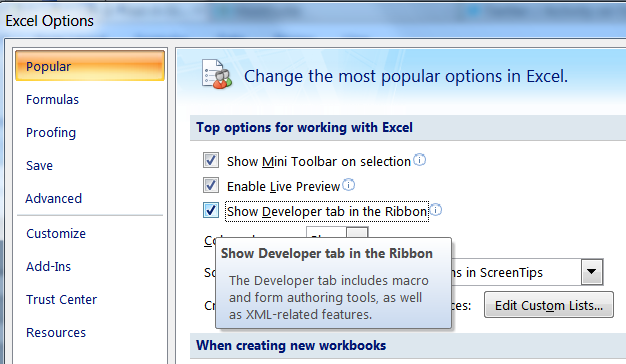
If you have never used macros before, then you will first have to access the tools to use them.
  • Click the Excel logo in the top left-hand corner of your workbook.
  • Click the button 'Excel Options' from the bottom right-hand corner of the pop up menu.
  • Tick the box next to 'Show Developer Tab in the Ribbon'.
  • Press 'Ok'.


Did you imagine the level up fireworks then? If so, then your reward for this level is to access macros. Congrats!

Using a Macro to Sort the Data in our Runescape Hiscores Averages Table

Until now, we have been either using a sort filter or else manually rearranging the data in our Hiscores Averages table. Half the time, we might mess up and accidentally sort the wrong columns. Retyping all those formulas is a pain, isn't it? It's time to make our life a lot easier.
  • Open up the worksheet with your Averages Table in it.
  • Click on the 'Developer' tab from the workbook's top toolbar.
  • Open 'Macro Security' and select 'Enable all macros (not recommended; potentially dangerous code can run)'. The warning is correct, but we need it open before we can create one! We'll disable it again later.
  • Press OK.
  • Open 'Record Macro'.
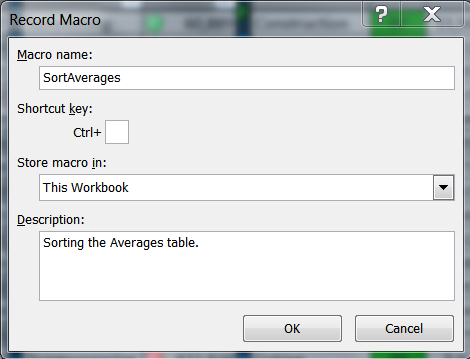
  • In 'Macro Name', type 'SortAverages'.
  • Ensure that 'this workbook' is selected under 'store macro in'.
  • Add a description if you want to.
  • Press OK.

  • Select the 'Home' tab from the top toolbar.
  • Highlight cells Q2 to S26, ie the data under the skills, level and XP columns of your Averages table.
  • Select 'sort and filter' from the 'Home' toolbar.
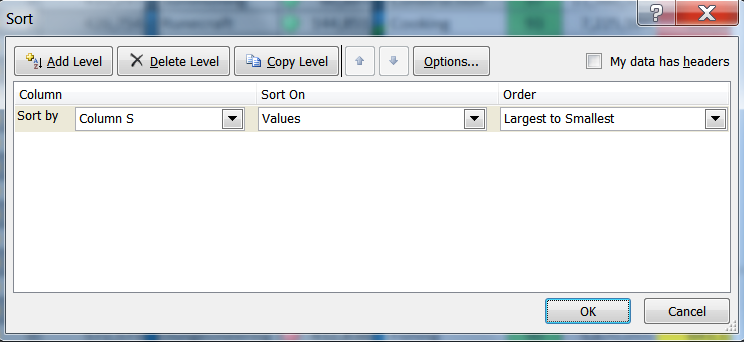
  • Select 'custom sort'.
  • Sort by Column S; sort on Values; order them Largest to Smallest.
  • Press 'OK'.
  • Return to the 'Developer' tab.
  • Press 'Stop Recording' from the 'Code' category.

Congratulations! You just created your first macro. Ok, you can't see it yet, but it's saved in the background waiting for you to use. In short, Excel has just recorded actions that you took. In future, it can simply replay them.

Of course, this is no use, if you haven't got anything to press to cause it to replay.
  • Click the cell where you want to insert a 'Sort' button. (I'm going for cell Q30.)
  • Click 'Insert' in the 'Developer' tab.
  • Select an icon or button. (I'm going for the very first that you see. It's called 'Button (Form Control)'.
  • Type 'Sort' on the button. (You can pretty it up in the 'Home' tab, where all of the fonts and colours are.)
  • Right-click the button and select 'Assign Macro'.
  • Select 'SortAverages' from the list.
  • Press OK.
Whenever you now press that button, it will replay your actions from earlier. The columns will be sorted.


Using a Macro to Sort the Data in our Runescape XP to Next Level Table

I had a sort filter already on my XP to Next Level Table. Before I start my macro, I'm going to remove that.
  • Highlight cells N1 to O26.
  • Click the 'Sort and Filter' button on the 'Home' toolbar.
  • Select 'Filter' from the pull down menu.

Remember that I only did that because I had a filter active on it. If you didn't, then skip the above step. It is removed when the icon beside 'Filter' isn't highlighted.
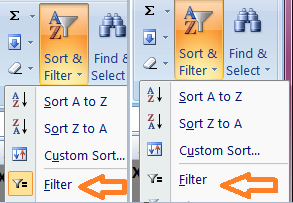

In the first image, it's active. In the second image, it's not. You want it off.

    Click on the 'Developer' tab.
  • Open 'Record Macro'.
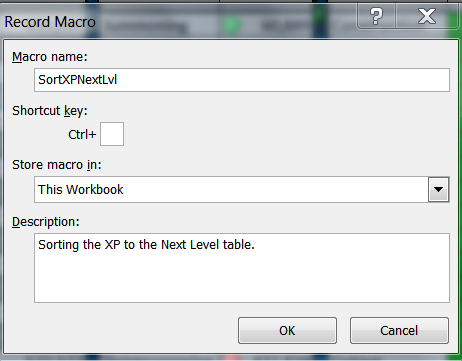
  • In 'Macro Name', type 'SortXPNextLvl'.
  • Ensure that 'this workbook' is selected under 'store macro in'.
  • Add a description if you want to.
  • Press OK.


  • Select the 'Home' tab from the top toolbar.
  • Highlight the XP to Next Level table.
  • Select 'sort and filter' from the 'Home' toolbar.
  • Select 'custom sort'.
  • Sort by Column O (XP to Next Level); sort on Values; order them Smallest to Largest.
  • Press 'OK'.
  • Return to the 'Developer' tab.
  • Press 'Stop Recording' from the 'Code' category.

Now you just have to add a button in precisely the same way as you did before, except that you assign your latest recorded macro to it.

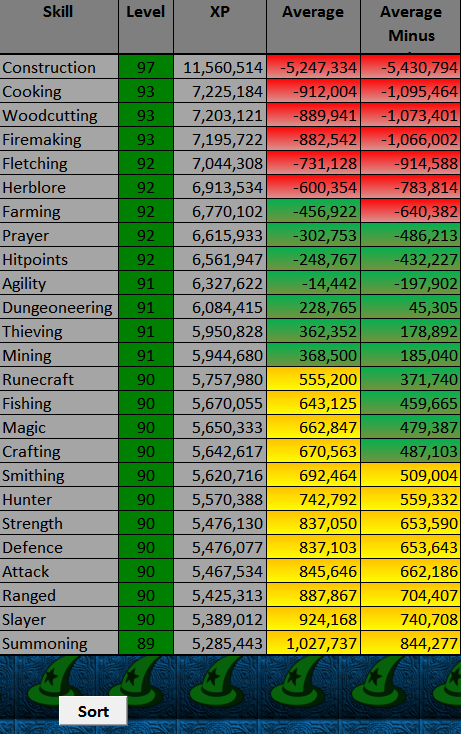
My worksheet now looks like this:
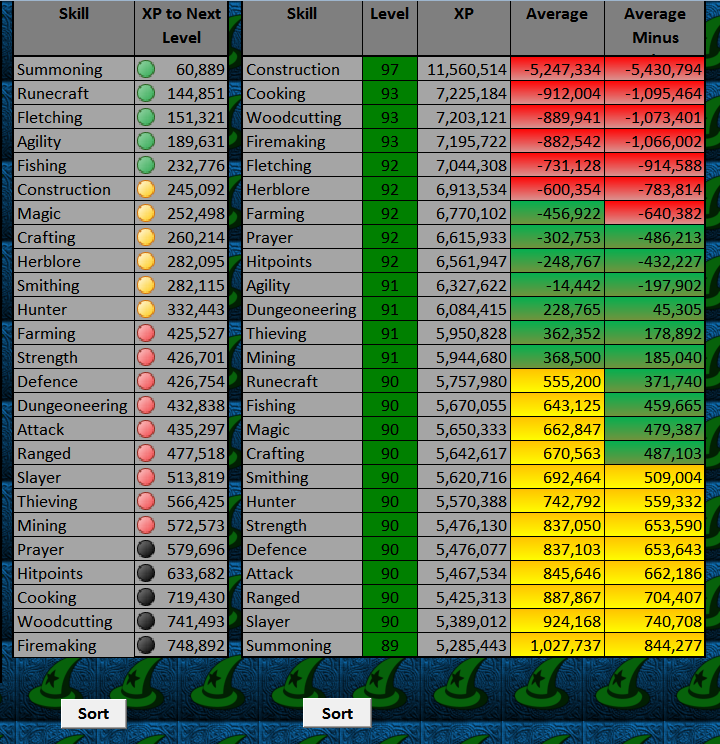

Your buttons probably look a lot more artistic than mine! LOL

Using Excel Macros to Record Yesterday's Runescape Hiscore Data

In part five, I told you that macros could be used to track your daily XP on Runescape. This is the fabled option three, which will copy data to populate columns C, D and E on your Daily Tracker.
  • Open your worksheet with the daily tracker table on it.
  • If you hid the previous data, click B and F to highlight their respective columns. Right-click and select 'unhide'.
  • Record a macro, entitled 'DailyXP', of you manually transferring the relevant data. (This was outlined as Option 1 in part five.)
  • Stop recording.
  • Hide your columns C, D and E again. (Highlight them, right-click and select 'hide'.)

You have now set a macro to do all of that sorting for you. You could insert a button, in the same way that you did to sort the other two tables, in you wished. However, we can make this even more automatic by asking Excel to run it for us.

Instructing a Macro to Run at a Certain Time

It is possible to ask Excel to run a macro at a specific time. This has obvious benefits for recording daily XP. It doesn't require you to remember to transfer your data.

Unfortunately there is a limitation too - the workbook has to be open at the time. For those people with enough Green awareness to switch their computer off at night, then this could constitute a problem. If you habitually play Runescape with your Excel Hiscores Tracker open, and finish at the same time each day/night, then there should be no problem at all.
  • Click on the 'Developer' tab on Excel's top toolbar.
  • Double-click 'View Code' in the 'Controls' category.

This area of Excel should come with a warning saying, 'Here there be dragons'. But we're all Runescape players, so a mere dragon holds no danger. Apply a mental dragonfire shield and sip some imaginary anti-fire potion and explore the coding section of Microsoft Office Excel.

On the left-hand side, you will see two lists under the heading VBAProject and the name of your workbook. Microsoft Excel Objects individually lists all of the worksheets. Modules has all of the macros that you've recorded.

If you double-click Module1, you'll see the Sort Averages code, the Sort XP to the Next Level code and the DailyXP code. All of these were created just now, as we recorded ourselves doing them. When Excel repeats our actions, it's merely reading what's in this module. This can be edited, if you wished.
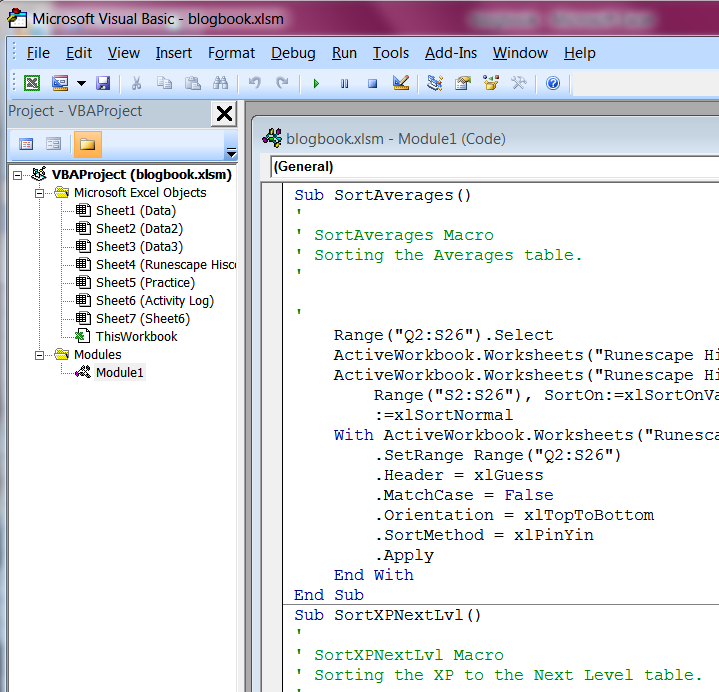

That's just for information. To set our macro to run at a certain time, we need to place a bit of code in another sheet.
  • Double-click 'ThisWorkbook' from the 'Microsoft Excel Objects' list.
  • Copy and paste the following code into the pad that pops up:
Private Sub Workbook_Open()
Application.OnTime TimeValue("23:00:00"), "DailyXP"

End Sub
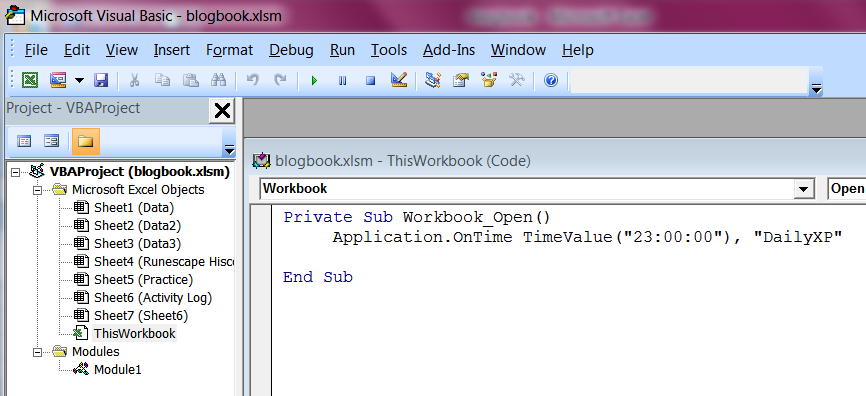
  • Close the Visual Basic area by clicking on the X in the top right-hand corner.
  • Save and close your Excel workbook.

We've closed the workbook because macros like these are only saved when you reopen the workbook once. Thereafter it will run without the need to close and open it again. So go ahead and do open up your Runescape Excel Hiscores Tracker again.

The code that we've inserted will cause the macro to run at 11pm every night. It takes the time from your own computer clock, so we don't have to worry about timezones here. But 11pm might not be the ideal time for you.

The part of that controlling time is ("23:00:00"). It runs in 24 hour clock - hour:minutes:seconds. If you want to change it, then open up the Visual Basic section again and double-click 'ThisWorkbook' to display the pad. Then you merely edit the time to one of your choosing.

Macros in our Excel Runescape Hiscores Tracker

There are a variety of ways in which macros can be used and set in Excel. If you can think of something else that you wish could be done automatically, then a macro can probably help. There are hundreds of websites devoted solely to walking you through macros, so just do a search to see if it's possible to do what you want to do. My recommendation is always to experiment!

I hope that you've found this section of the guide useful. Next time, I will be showing you how to add some XP and price calculators to your Runescape Hiscores Tracker.
Part 5: Extra: Correction and Apology

In part five of the guide, to making a Runescape Hiscores Tracker in Microsoft Office Excel, I told you to do this:

In cell I2, copy and paste the following formula: =D2 - H2

The formula was the wrong way round!  Whenever you gained a level, the table told you that you'd lost one instead. Ooops!  That should have read:


In cell I2, copy and paste the following formula: =H2 - D2

What can I say? I'm a noob.   I've just corrected that in the original blog entry, but if you've been following this as it's published, you'll need to alter that in your Daily XP Tracker too.

Apologies for that!

Saturday, 10 December 2011

Part 5: Tracking Daily XP in your Runescape Excel Hiscores Tracker

Welcome to my series on how to create a Runescape Hiscores Tracker in Microsoft Office Excel!

Yesterday, I hunted penguins, then spent my points on Summoning XP. Ths involved teleporting all over Gielinor. I also converted some charms into pouches, before chipping away at some gems with my chisel. In the middle of all of this, I caught an impling or two, as they flew by me. Finally I couldn't put off the dreaded thing hanging over me in-game. I had to have another attempt at killing Vanstrom Klause.

I tooled up in Edgeville Bank, where someone optimistically asked if anyone had 97 Construction to assist him with his effigy. Yes, I did. I helped him out. Then it was off to Darkmeyer, where I accidentally hit a vyrewatch, before fleeing to the safety of the bank. I fought Vanstrom with range. He turned into mist and I threw the Holy Water. But he wasn't lured onto it and it missed. He killed me.

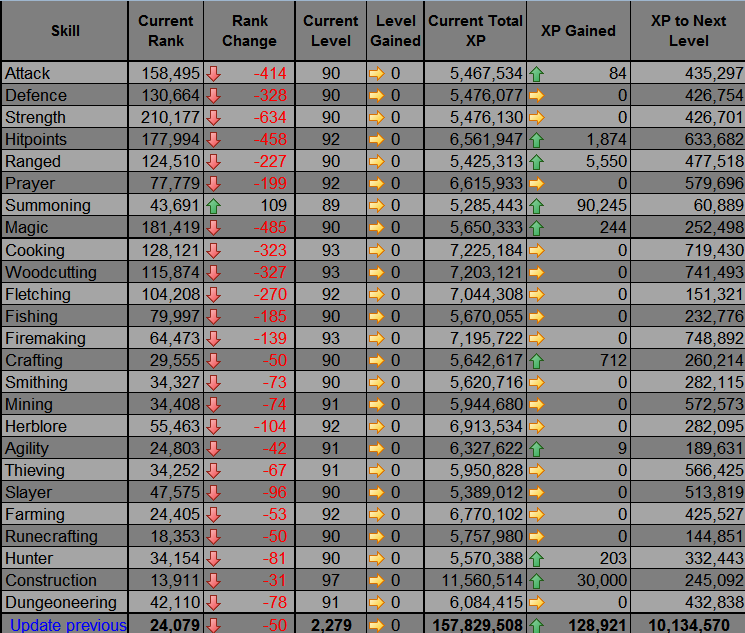
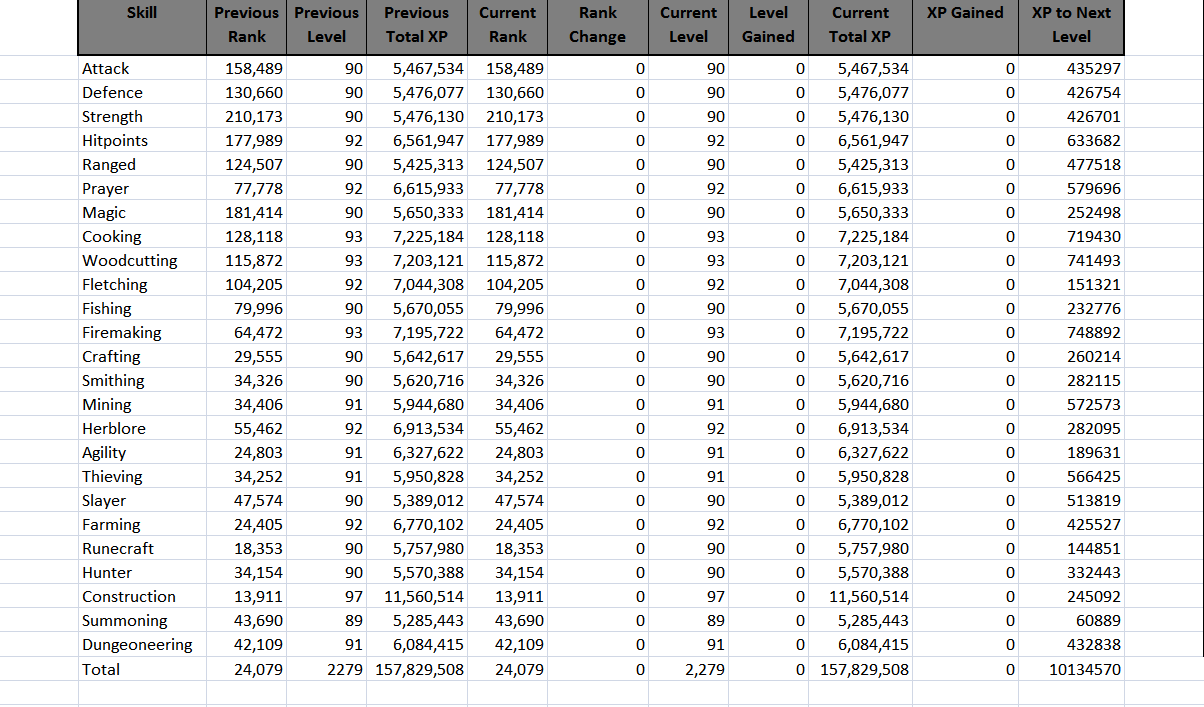
Once the dust had settled and the nerves salved, the next question was how much XP did all of that gain me? The answer was in my Excel Runescape Hiscores Tracker. Glancing down the XP Gained column retold the story of my in-game activities in cold, hard facts. I'd netted 128,921 total XP, split up across eight skills.


This is the table that I'll guide you through creating for yourself.

Runescape Excel Hiscores Tracker: The Story So Far

This guide will be written in the assumption that your workbook looks exactly like mine. For that to be the case, then you will have had to follow the previous entries. All of the data referred to and the tables created are outlined in them.

Part 1: How to Make a Runescape Hiscores Tracker in Microsoft Office Excel - Collecting data ready to feed your tables and charts.

Part 2: Averages Table in your Runescape Excel Hiscores Tracker - Creating the first table, which worked out your XP averages from highest to lowest skill. There was also a bonus section answering some formatting questions, mostly from those new to Excel.

Part 3: Calculating XP to Next Level in your Runescape Excel Hiscores Tracker - Creating a table to calculate the XP needed until your next level.

Part 4: Adding Activity Logs and More to your Runescape Excel Hiscores Tracker - Using the contents of websites to add data into Excel, notably a couple of ways to add your Runescape Activity Logs.

Let's get on with creating a daily XP tracker!

Building Your Table to Track Daily Runescape Experience

I want to chart my daily XP on the same page as I have my XP to Next Level and Hiscore Averages tables. There's still enough room there to see it all in one place. Before I can do that, I need to move those tables along. Skip this part, if you want to place your table in a different worksheet. Part four described how to do that.
  • Open up the worksheet with your tables in it.
  • Highlight the first column by clicking on the 'A'.
  • Right-click anywhere in that column.
  • Select 'insert' from the pull-down menu.
  • Repeat that until the 'Skill' column of the XP to Next Level table is in column N.
  • Click in cell B1,then drag your cursor to cell L1.
  • Colour and format them to match your other headers.
  • In cell B1, type 'Skill'.
  • In cell C1, type 'Previous Rank'.
  • In cell D1, type 'Previous Level'.
  • In cell E1, type 'Previous Total XP'.
  • In cell F1, type 'Current Rank'.
  • In cell G1, type 'Rank Change'.
  • In cell H1, type 'Current Level'.
  • In cell I1, type 'Level Gained'.
  • In cell J1, type 'Current Total XP'.
  • In cell K1, type 'XP Gained'.
  • In cell L1, type 'XP to Next Level'.
  • Widen any column necessary to display your headers.
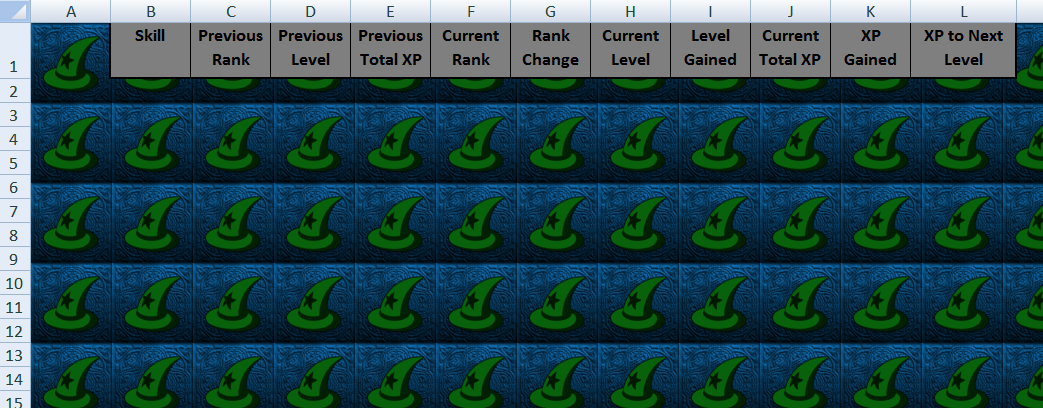
Yes, this is going to be a huge table! But three of those columns will likely end up hidden by the end of it.  My worksheet currently looks like this:

Please click the image for a full-sized view.

Actually, I'm going to delete the background for a moment, just to make it easier to work with. Just skip this step, if you're fine.
  • Select the 'Page Layout' tab from the top toolbar.
  • Click 'Delete Background'.
  • If you've removed the gridlines, select the 'View' tab from the top toolbar.
  • Tick the box beside 'Gridlines', in the 'Show/Hide' category.
I can now see what I'm doing, so it's time to add some formulas.

Inserting Existing Data into your Runescape Daily XP Tracker Table

This is a big table, but you already know how to populate most of those columns. The data is in your datasheets and it's simply a case of putting in the address to display them.

  • In cell B2, copy and paste the following formula: =Data!B2 (NB: Change Data to whatever you called your data worksheet.)
  • Drag the formula down to cell B26.
  • In cell B29, type Total. (Rows 27 and 28 were hidden under the averages table. If you didn't hide them, then all that I say for row 29 replace with row 27.)
  • In cell F2, copy and paste the following formula: =Data!G2
  • Drag the formula down to cell F26.
  • In cell F29 (or F27), copy and paste the following formula: = Data!G1.
  • In cell H2, copy and paste the following formula: =Data!C2
  • Drag the formula down to cell H26.
  • In cell H29 (or H27), copy and paste the following formula: =Data!C1
  • In cell J2, copy and paste the following formula: =Data!F2
  • Drag the formula down to cell J26.
  • In cell J29 (or J27), copy and paste the following formula: =Data!F1
  • In cell L2, copy and paste the following formula: =Data!J2
  • Drag the formula down to cell L26.
  • In cell L29 (or L27), copy and paste the following formula: =SUM(L2:L26)

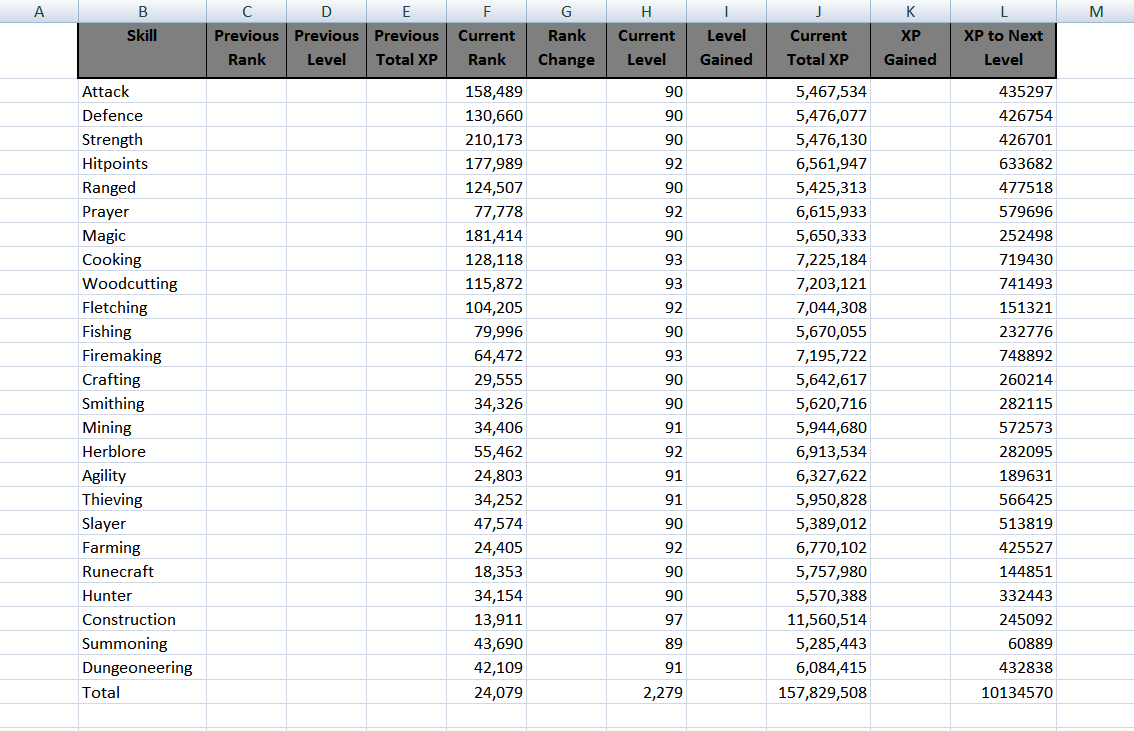
My table now looks like this:

Please click on the image for a full-sized view.

Basic Mathematics in Excel Spreadsheets

The mathematically minded amongst you will now be flashing a little smile, when you learn that some of these columns are going to include just basic subtraction.
  • In cell G2, copy and paste the following formula: =C2 - F2
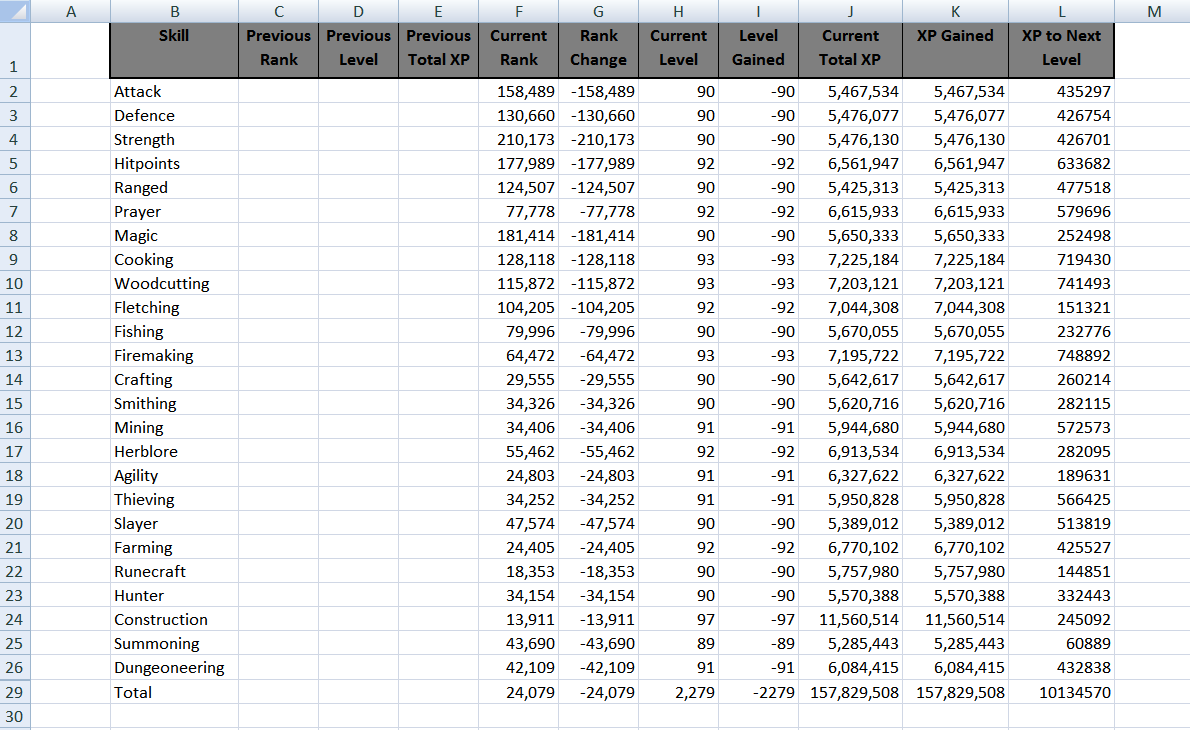
  • Drag the formula all the way down to the end of your table. (It will all be in minus numbers at the moment, because we haven't got anything in column C2.)
  • In cell I2, copy and paste the following formula: =H2 - D2
  • Drag the formula all the way down to the end of your table.
  • In cell K2, copy and paste the following formula: =J2 - E2
  • Drag the formula all the way down to the end of your table.
That really was taking the number in one cell and subtracting it from the number in another.

This is how my table looks now:

Please click on the image for a full-sized view.

Inserting the Previous Day's Data into an Excel Worksheet

Our Runescape Daily XP Tracker is now poised and ready, but for three important columns of data. There are three ways of doing this, so it's a matter of personal choice which one you choose.

Option One: Manually Inserting the Data
  • Highlight cells H2 to H29 (H27).
  • Right-click and select 'copy'.
  • Open your XP Tracker worksheet.
  • Click cell D2.
  • Right-click and select 'paste special'.
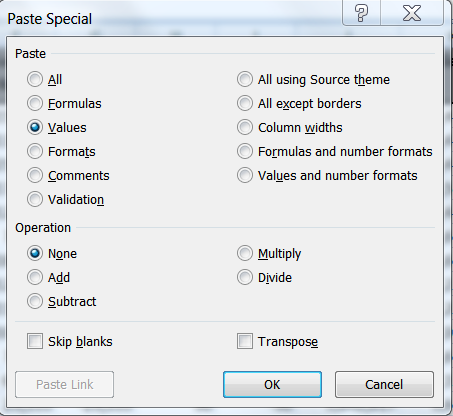
  • Select 'Values'.
  • Press 'Ok'.
  • Repeat for C2, copying the values from F2 to F29 (F27).
  • Repeat for E2, copying the values from J2 to J29 (F27).
This is now ready to use, give or take a little colouring in. The values in columns C, D and E won't change until you repeat the above steps. The rest of it will continue to automatically update. As you gain XP and levels, this will be recorded in your table.

Please click the image for a full-sized view.

There is an obvious limitation here. You would have to remember to transfer your data before you started playing. The second two options will do it automatically.

Option two: Stealing the Data from Elsewhere.

The internet is full of websites which track your Runescape Hiscores data on-line. Part four was all about taking data off the internet and inserting it into your Excel spreadsheet.

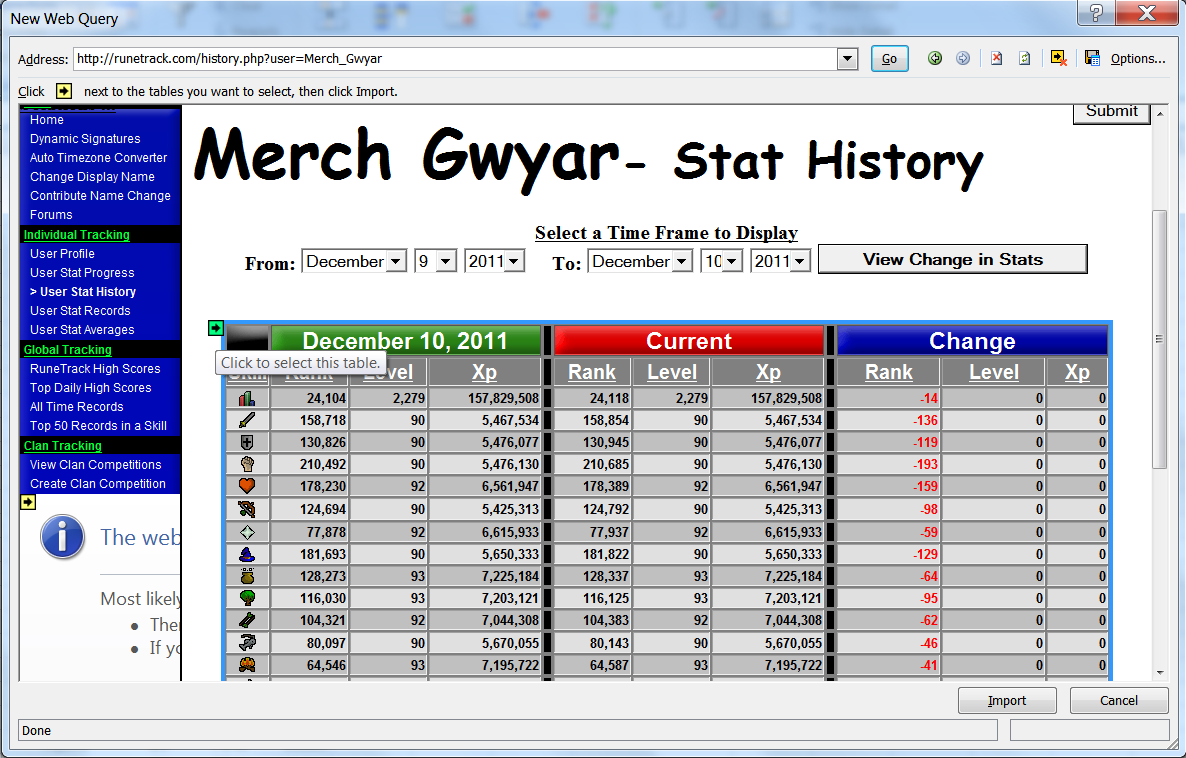
Your latest quest is to find a website that tracks your daily history. One such site is Runetrack. You could set up an account there and then insert the information off that webpage into your Excel data sheet.


Once you have the data, then it's merely a case of asking your table to automatically update. You can do that by inserting the formula: =[nameofyourdataworksheet]![celltoread]


The benefits are obvious. The whole table again automatically updates, so if you forget to tranfer your data, it doesn't matter. Your previous stats update, whenever the previous stats on the website update.

However, this isn't really fair on the individuals, like the coders and owners of sites like Runetrack. They've put in the hard work and you're reaping the benefits daily, without going near their site again.

Also should Runetrack's Sword Kill11 (or one of his counterparts from another Runescape hiscores tracking site) decide to close down, your Excel tracker will simply stop working.

Option three is to use a macro to automatically copy your data at a set time every day. I'll be coming to macros in a later guide, so I'll see you there for this one.

Finishing off your Runescape Daily XP Tracker in Excel

Once you have the data in there, and it's all working nicely, then all that remains is to make it pretty.
  • Highlight columns C, D and E by clicking the letter at the top.
  • Right-click anywhere in the highlighted columns.
  • Select 'hide'.
  • Colour and format the remaining table.


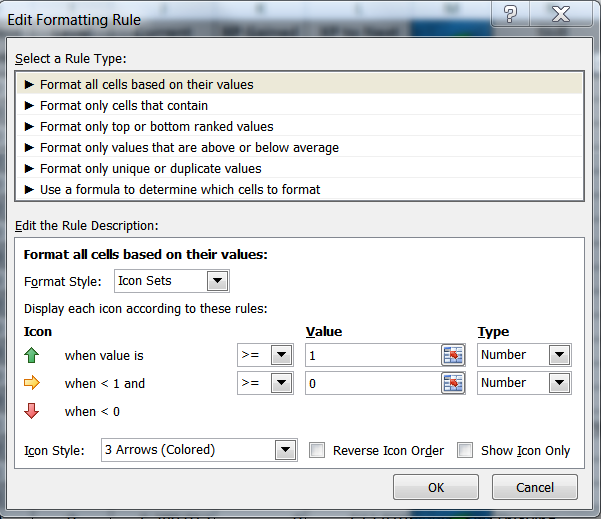
Because we have some moving data here, we can spruce it up with some more icon sets. I walked you through this in part three. But I'll show you how I'm going to add some to this table too.

  • Highlight cells G2 to G29 (G27).
  • Select 'Conditional Formatting' from the 'Home' tab at the top of your Excel workbook.
  • Select 'Icon Sets' from the menu.
  • Select '3 Arrows (Coloured)' from the options.

  • Highlight cells G2 to G29 (G27) again.
  • Select 'Conditional Formatting'.
  • Select 'Manage Rules' from the bottom of the menu.
  • Click 'Edit Rule'.
  • Set the green arrow type to 'Number'.
  • Set the value as 1.
  • Set the yellow arrow type to 'Number'.
  • Set the value as 0.
  • Press Ok.
  • Press Apply.
  • Press Ok.


Just repeat that for I2 to I29 (I27) and K2 to K27 (K29) and you're all done.

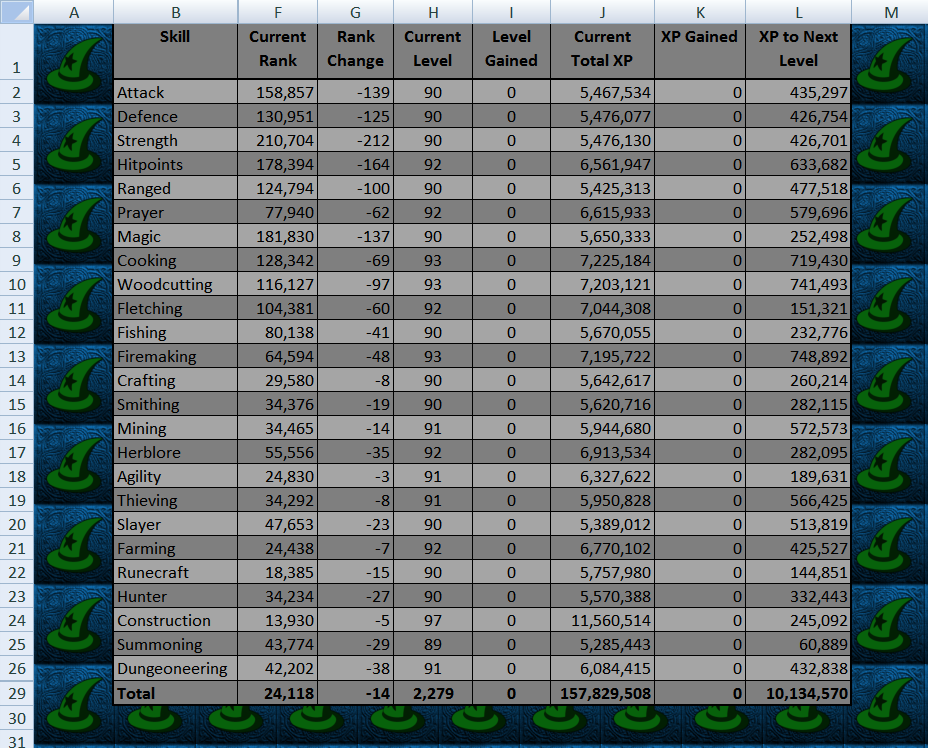
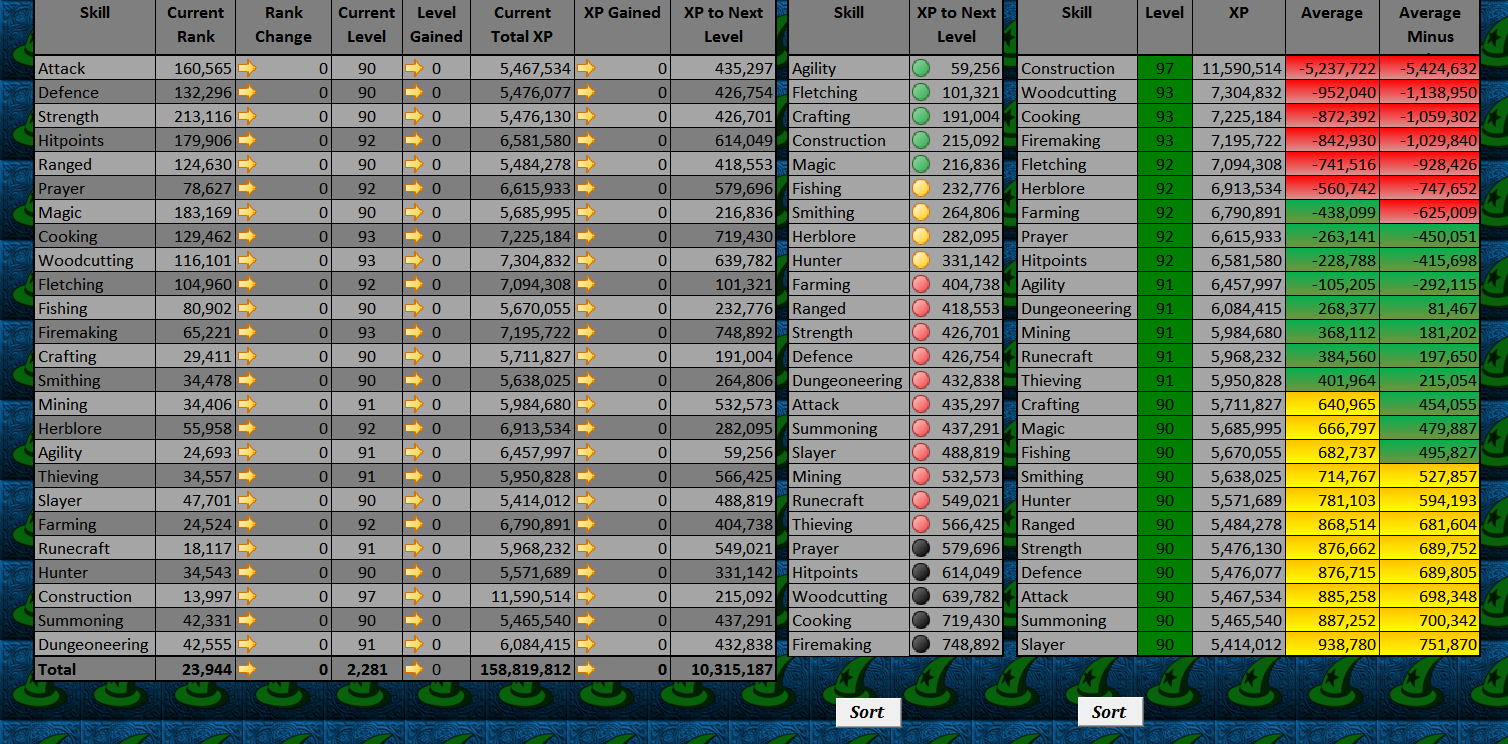
Here is how my worksheet now looks:

Please click image for a full-sized view.

Next time, we will finally get around to adding some macros.

Thursday, 8 December 2011

Part 4: Adding Activity Logs and More to your Runescape Excel Hiscores Tracker

Welcome to my series on creating your own Runescape Hiscores Tracker in Microsoft Office Excel. This time, we will be looking at how to add player Activity Logs and more.


For those just joining us, this guide is written in the assumption that you have already completed the first three:
Part 1: How to Make a Runescape Hiscores Tracker in Microsoft Office Excel - Collecting data ready to feed your tables and charts.

Part 2: Averages Table in your Runescape Excel Hiscores Tracker - Creating the first table, which worked out your XP averages from highest to lowest skill. There was also a bonus section answering some formatting questions, mostly from those new to Excel.

Part 3: Calculating XP to Next Level in your Runescape Excel Hiscores Tracker - Creating a table to calculate the XP needed until your next level.

Now it's on to grabbing more data and creating a chart to show off your latest Runescape achievements.

Creating Another Data Worksheet in Excel

We already have one data worksheet, but I'm going to recommend another. This is for no other reason than to keep it looking neat and tidy, especially as we're about to insert a massive chunk of automatically up-dating information.
  • Right-click the 'Sheet3' tab at the foot of your Excel workbook.
  • Select 'Rename'.
  • Type 'Data2' and press enter.
  • Left-click the 'Data2' tab and drag it in between your other two tabs.


We will be working on the Data2 sheet for the next part.

The Runescape Activity Log Data Feed in your Hiscore Tracker

The very first task that we did, in this series, was to take data from a web query. That produced Jagex's hiscore lite text feed, which was lovely, but now we're going to take this to the next level.
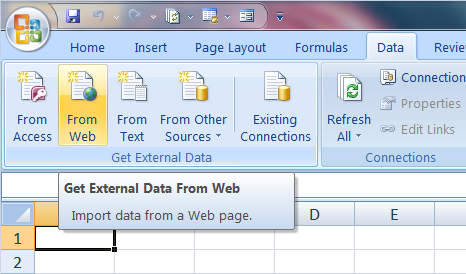
  • From Excel's top toolbar tab, select 'Data'.
  • Select 'From Web' from the 'Get External Data' category.


A mini browser will pop up. This gives you access to anywhere on the web, which will prove extremely useful in getting data for our Runescape Excel Hiscores Tracker.
  • Copy this URL: http://services.runescape.com/m=adventurers-log/rssfeed?searchName=[player name]
  • Paste it into the address bar of the pop up browser.
  • Change [player name] to your own Runescape name. (Mine is http://services.runescape.com/m=adventurers-log/rssfeed?searchName=Merch Gwyar.)
  • Click the little yellow and black square to highlight the contents of the browser.
  • Press 'Import' at the bottom.
  • Excel will tell you that the XML source does not refer to a schema. We don't care. Press OK.
  • Press OK on the Import Data box. (But only if it's got 'XML table in existing worksheet' ticked for the cell $A$1.

You should now be seeing why I recommended a separate data worksheet, as the information fills the page. This works on any RSS feed, so do experiment with adding in any that you think will be useful. It will automatically update as soon as you log out of the game or, more specifically, as soon as the Activity Log updates on the Runescape site.

Displaying your Runescape Activity Log in Excel

The beauty of Microsoft Office Excel is that it allows you to have more than one tab. I'm going to create a new page to display my Activity Log.

  • At the foot of your workbook, click the final tab. (It has an icon of a worksheet with a little gold star in the corner.)
  • Rename 'Sheet4' to read 'Activity Log' (or the name of your choice).
  • Click cell A1 and type 'Activity'.
  • Click cell B1 and type 'Description'.
  • Click cell C1 and type 'Date'.
  • Copy and paste the following formula into cell A2:

    =Data2!K2
  • Drag that formula down to cell A51.
  • Widen column A, so it easily displays the information.
  • Copy and paste the following formula into cell B2:

    =Data2!L2
  • Drag the formula down to cell B51.
  • Widen the B column to fit the information.
  • Repeat the process in C2, but with the following formula:

    =Data2!N2

You should now have all your Activity Log handily showing in your Runescape Hiscores Tracker. You will not need to touch that data again, so let's make the page go away.
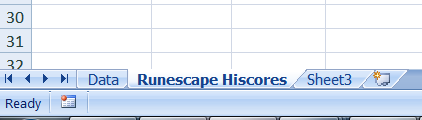
  • Right-click the 'Data2' tab.
  • Select 'hide'.
Bye-bye Data2 Worksheet. Should you ever need it again, just click to create a new worksheet. If you right-click the tab of a blank worksheet, you'll find the option to 'unhide'. Selecting that will list all of your hidden sheets and Data2 will there amongst them. Once you click the name, Data2 will be visible again.

All that remains now is to colour, format and do whatever else you would like to make your Activity log look pretty. These techniques have been walked through before, so I won't repeat them here.

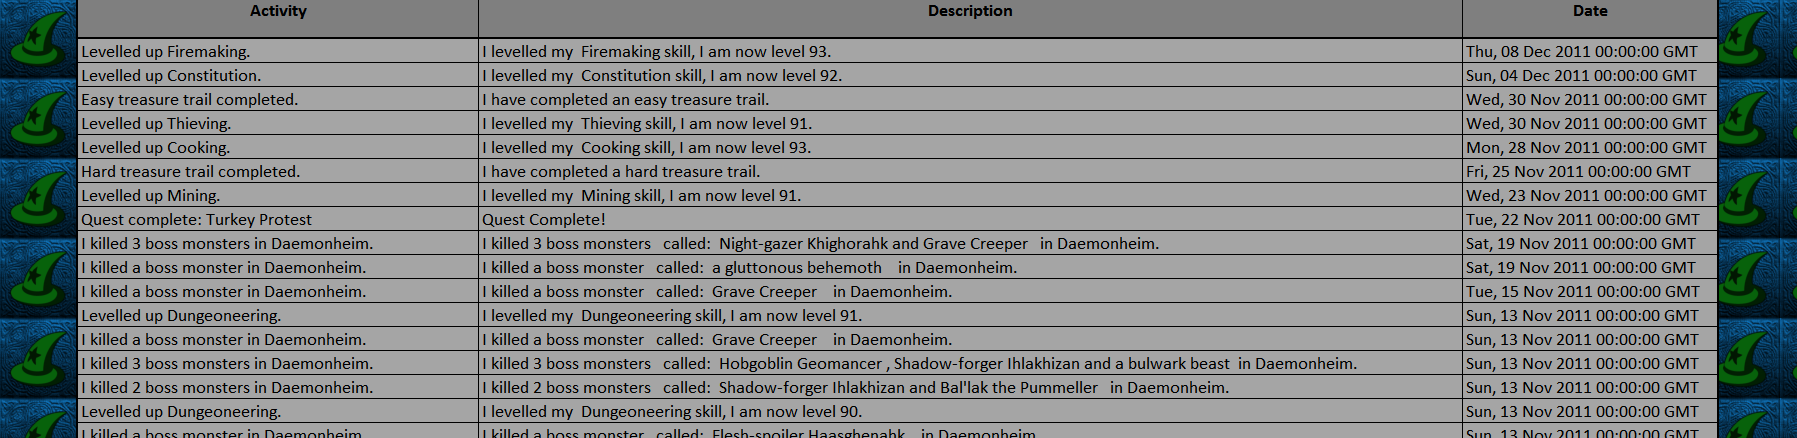
My Activity Log now looks like this:

Click the image for a full-sized view.

An Alternative Way of Adding Activity Log Data to your Hiscores Tracker

We've added text lite and RSS feeds from the web, but we can also insert the information from whole web-pages. As that updates, then so will the raw version in your Excel workbook.
  • Create a new worksheet.
  • Name it 'Data3' and drag the tab to a position after your main datasheet. 
  • From Excel's top toolbar tab, select 'Data'.
  • Select 'From Web' from the 'Get External Data' category.
  • Copy and paste the following URL into the address bar of the pop-up brower:

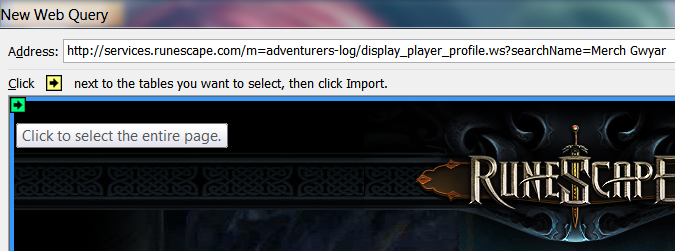
    http://services.runescape.com/m=adventurers-log/display_player_profile.ws?searchName=[player name]
  • Replace [player name] with your Runescape name. (My URL is: http://services.runescape.com/m=adventurers-log/display_player_profile.ws?searchName=Merch Gwyar.)


  • Click the yellow and black box to highlight the whole page.
  • Press the 'Import' button.
  • Press OK on the pop up 'Import Data' box. (But only if 'Existing Worksheet' is selected and =$A$1 is the cell named in the box.)

A lot of raw data will be copied into your Excel worksheet. It doesn't look like the webpage that you nicked it off, but it will update as that page does. By scrolling down and comparing the two, you will see what data you have. Anything can be taken from this worksheet and added to a table in the usual way.

Creating a Small Runescape Activity Log Tracker from Website Data

As this isn't the full RSS feed, the number of activities is much reduced. We want a table with three columns and five rows.
  • Chose where you wish to place it and create that table.
  • Colour it in, then format it with borders.
  • Type 'Activity', 'Description' and 'Date' in the cells heading each column. These are the headers.
  • In the cell under the 'Activity' header, copy and paste this formula:

    =Data3!A292

Just a refresher for those unfamiliar with that formula. It is basically an address. 'Data3' is the name of the worksheet; A292 is the cell that from which we wish to copy the contents.

  • In the cell under the 'Description' header, copy and paste this formula:

    =Data3!A293
  • In the cell under the 'Date' header, copy and paste this formula:

    =Data3!B292
  • Repeat this for the next row, using these three formulas in each consecutive cell:

    =Data3!A294
    =Data3!A295
    =Data3!B294
  • Repeat this for the third activity row, using these three formulas:

    =Data3!A296
    =Data3!A297
    =Data3!B296
  • Repeat this for the final row, using these three formulas:

    =Data3!A298
    =Data3!A299
    =Data3!B298
  • Hide the 'Data3' worksheet.
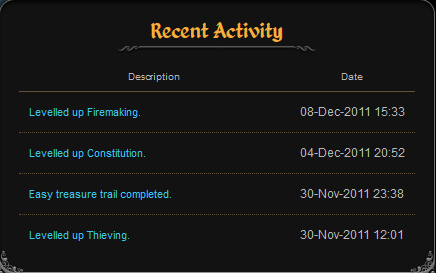
My little Activity Log looks like this:
Please click the image for a full size version.

Website Data and Tables for your Runescape Hiscores Tracker

The main point that I wished to demonstrate, with the last table, was that you can take disparate cells and put them together to make your own charts. The sprawl of data that you took from the Runescape Activity Log webpage has plenty more opportunities to feed tables.

For example, you could add another column to your XP to the Next Level table, by altering that formula to read the data telling you the percentage of a Level completed. That's listed in the Data3 worksheet. Just find the cell letter and number, then add it to =Data3! and paste it in.

This works with every webpage out there, so happy hunting for things to add to your Runescape Excel Hiscores Tracker!

Next time we will be looking at ways to track your daily XP gains.

Wednesday, 7 December 2011

Part 3: Calculating XP to Next Level in your Runescape Excel Hiscores Tracker

Welcome to my series on making a Runescape Hiscores Tracker in Microsoft Office Excel. Once set up, this spreadsheet will automatically update each time you log out of the game.

So far, we've grabbed some data, then made a chart to work out the average of the whole for each skill. In a bonus section to part two, I answered some questions about formatting.


This is written on the assumption that you've been following the series so far. Now let's grab some more data and create a new table. This one will automatically calculate how much XP is needed to your next level in every Runescape skill.

Runescape Excel Hiscores Tracker: Adding More Data

Before we can calculate the XP needed, we need to know the amount that causes you to level up. This is probably the easiest insertion of data for you, because I'm going to provide it!

  • Open your Runescape Hiscores Tracker Excel Workbook.
  • Select the worksheet with your raw data in it.
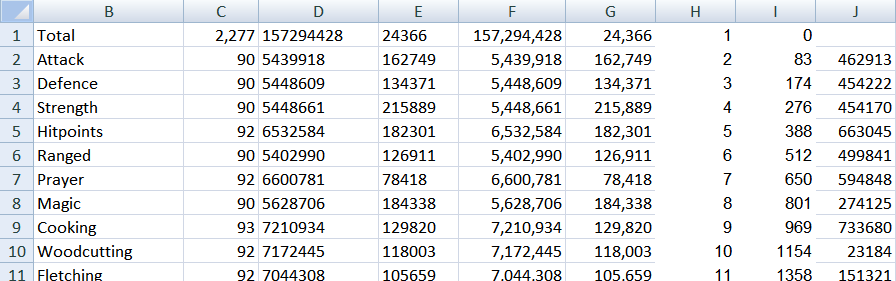
  • Copy and paste the following in cell H1:

    1
    2
    3
    4
    5
    6
    7
    8
    9
    10
    11
    12
    13
    14
    15
    16
    17
    18
    19
    20
    21
    22
    23
    24
    25
    26
    27
    28
    29
    30
    31
    32
    33
    34
    35
    36
    37
    38
    39
    40
    41
    42
    43
    44
    45
    46
    47
    48
    49
    50
    51
    52
    53
    54
    55
    56
    57
    58
    59
    60
    61
    62
    63
    64
    65
    66
    67
    68
    69
    70
    71
    72
    73
    74
    75
    76
    77
    78
    79
    80
    81
    82
    83
    84
    85
    86
    87
    88
    89
    90
    91
    92
    93
    94
    95
    96
    97
    98
    99

  • Copy and paste the following in cell I1:

    0
    83
    174
    276
    388
    512
    650
    801
    969
    1154
    1358
    1584
    1833
    2107
    2411
    2746
    3115
    3523
    3973
    4470
    5018
    5624
    6291
    7028
    7842
    8740
    9730
    10824
    12031
    13363
    14833
    16456
    18247
    20224
    22406
    24815
    27473
    30408
    33648
    37224
    41171
    45529
    50339
    55649
    61512
    67983
    75127
    83014
    91721
    101333
    111945
    123660
    136594
    150872
    166636
    184040
    203254
    224466
    247886
    273742
    302288
    333804
    368599
    407015
    449428
    496254
    547953
    605032
    668051
    737637
    814445
    899257
    992895
    1096278
    1210421
    1336443
    1475581
    1629200
    1798808
    1986068
    2192818
    2421087
    2673114
    2951373
    3258594
    3597792
    3972294
    4385776
    4842295
    5346332
    5902831
    6517253
    7195629
    7944614
    8771558
    9684577
    10692629
    11805606
    13034431


All done! My data sheet looks like this:


Runescape Hiscores Tracker: Naming Your Ranges

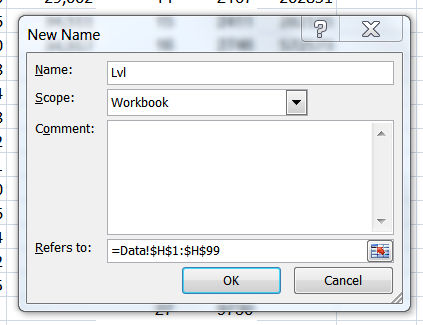
There is a formula coming up that's going to require us to name a range. We'd better do that then.

  • Click on cell H1 (which should currently have a 1 in it).
  • Drag your mouse down to H99 (which should currently have a 99 in it).
  • Right-click anywhere in the highlighted area.
  • Select 'Name a Range' from the pull down menu.
  • Call it 'Lvl' and click 'OK'.


  • Do the same for cells I1 to I99.
  • Call it 'Exp'.

Now that our columns of information are named, we can use that in a formula that looks things up on them. This is precisely what we're going to be doing next.

Looking Up The XP to Your Next Runescape Level in Excel

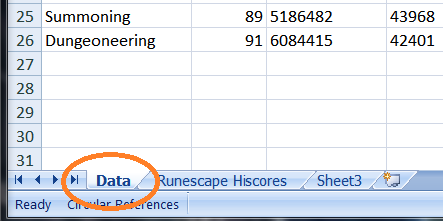
The worksheet, with all of my data in it, is imaginatively called 'Data' in my Excel workbook. It's important that you note what you called your tab, because it's going to be used in the next formula.


  • Click on cell J2.
  • Copy and paste the following formula:

    =IF(LOOKUP(C2+1,'Data'!Lvl,'Data'!Exp)-D2<0,0,(LOOKUP(C2+1,'Data'!Lvl,'Data'!Exp)-D2))
  • Change Data to whatever you called this page. (Or leave it alone, if you called the worksheet 'Data'. :p)
  • Press enter.
  • Woot at the fact that the XP to your next Attack level should be revealed.
  • Click on cell J2 again.
  • Left-click on the tiny square in the bottom, right-hand corner of the cell.
  • Drag it down to cell J26.
  • Happy dance.

This is how my data sheet looks now:


We have our data all calculated. All that remains now is to format it into a pretty table.

Creating a Table Charting the Experience Remaining

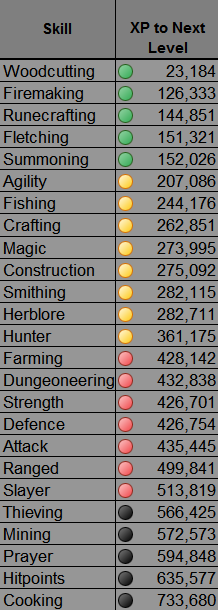
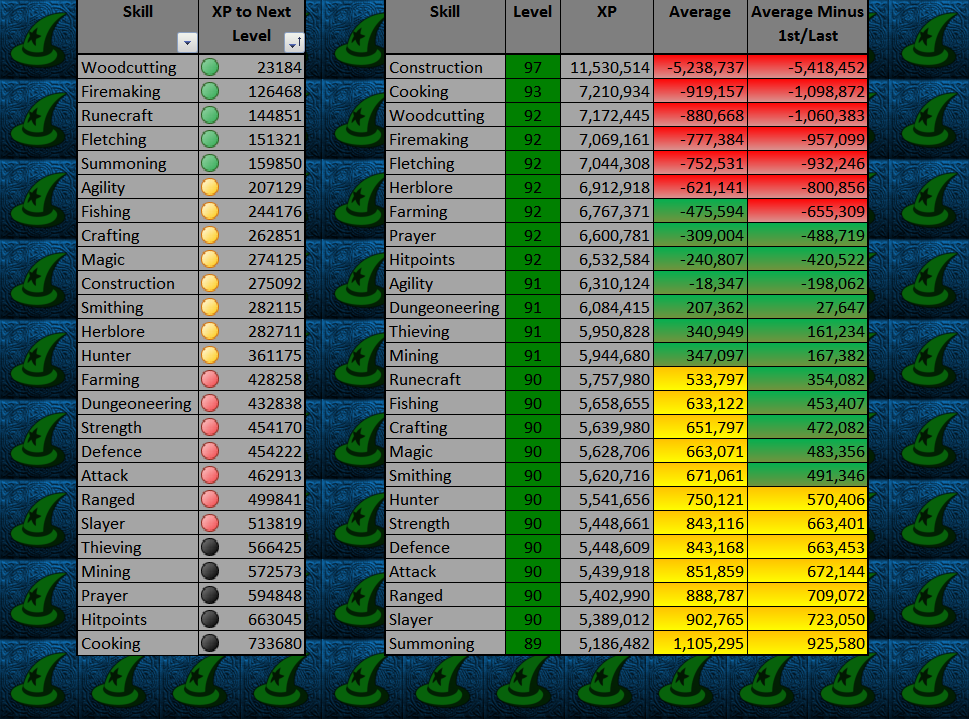
I'm going to walk you through creating a table that looks like this:


Obviously, you might want to add your own artistry to it. Please do feel free to colour and decorate it as you wish!

Open up your main worksheet, where you last created the Averages table. Mine is huddled up in the first five columns, so I'm going to move it along a bit.
  • Click the A to highlight the first column.
  • Right-click and select 'insert'.
  • Repeat that another three times.

  • Click cell E1.
  • Right-click and select 'copy'.
  • Click cell B1.
  • Right-click and select 'paste'.
  • Drag that over to C1, using the little corner box.
  • Click on C1.
  • Type 'XP to Next Level'.
  • Widen the C column, by clicking your cursor on the wall between C and D and dragging.
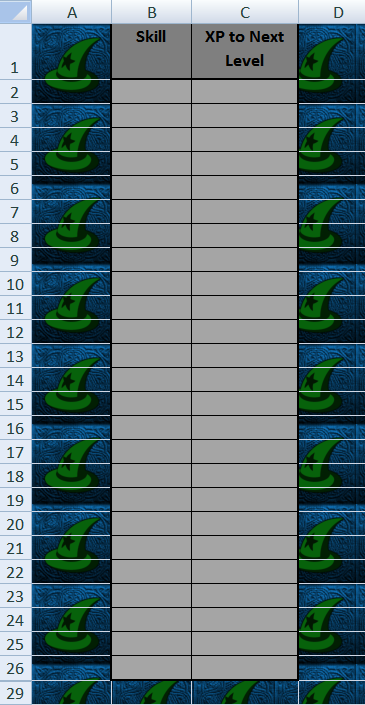
  • Highlight the cells B2 to C26.
  • Colour them in using the paint bucket.

This part is really formatting the cells to look pretty. I went through it this when we were making the Averages table, and added some more tips in the bonus blog, so please consult them.

I'm going for a light grey with full borders and gridlines.


Once it's all pretty, it's simply a case of adding a couple of formulas.
  • Click on B2.
  • Copy and paste this formula: =Data!B2.
  • Drag the formula down to B26.
  • Widen your B column, if necessary. (The word Dungeoneering will probably make it necessary.)
  • Click on C2.
  • Copy and paste this formula: =Data!J2.
  • Drag the formula down to C26.

Voila! All of your information in a handy table! But I want to add a bit more decoration, just to give it a splash of colour.
  • Highlight cells C2 to C26.
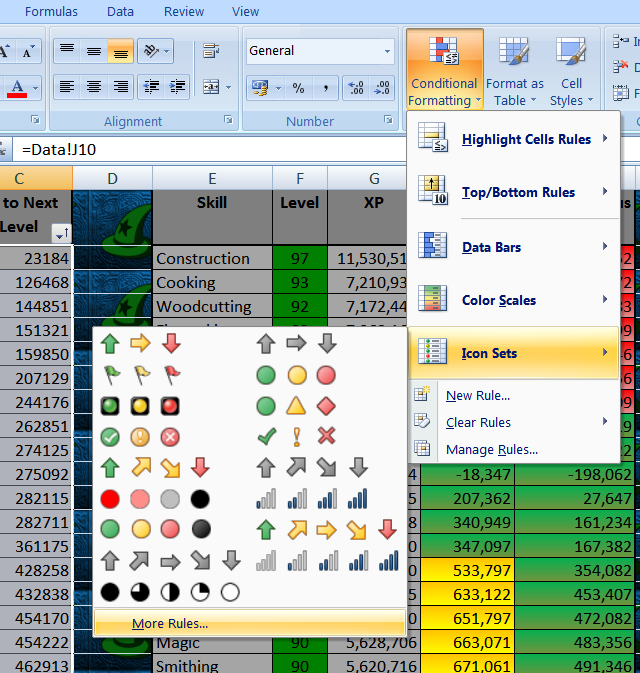
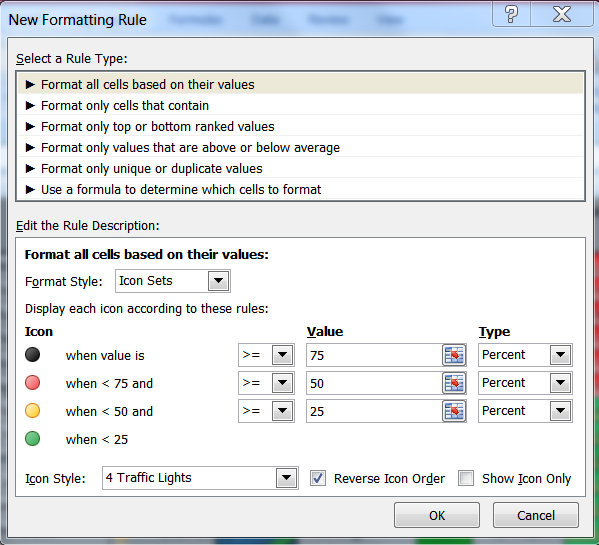
  • Click on 'Conditional Formatting', in the styles section of the Home tab toolbar.
  • Select 'Icon Sets'.
  • Select 'More Rules'.

  • Pull down the menu beside 'Icon Style'.
  • Select '4 Traffic Lights'.
  • Tick the box beside 'Reverse Icon Order'.
  • Click Ok.


There are loads of icon sets in there. If this one isn't thrilling you, then try another in the same way. But before we declare this table done, there's a big decision to make about filters.

Excel Worksheets: The Limitations of the Sort Filter

You could add a sort filter, as you did with the Averages table. Unfortunately a limitation of Excel is that you can only have one of these filters on any single worksheet. There is a work-around using macros, but that's a bigger job, so a tip for another day. For now, just decide which table you wish to have the handy button filter on. The other can be sorted manually by highlighting it and using 'sort and filter' to arrange it.

NB Do not sort the columns headed 'Average' and 'Average Minus 1st/Last', else it will lose the formatting.

I've opted to put the button filter on the XP table.

Two Runescape Hiscore Tracker Tables in Excel

There we have it. You now have two lovely and useful tables, nestled side by side on your Excel worksheet.


Next time, we'll look at how to add Activity Logs and more.

Tuesday, 6 December 2011

Part 2 Extra: More Formatting for your Excel Runescape Hiscores Tracker

It's great to learn that so many people are using this guide to make their own Runescape Hiscores Tracker in Microsoft Office Excel! Glad to have you along for the ride. *blows kisses*

Some people have been asking me questions. They're doing it in-game or on Sal's Realm of Runescape, just about everywhere but here, where the answers might be useful for everyone else. Nevertheless, I will answer them here.

How Do You Get Rid of the Gridlines in the Background of an Excel Worksheet?

This one is very easy. It will take about a second to do it.
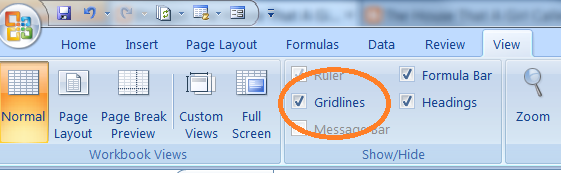
  • Select the 'View' tab from the top Excel toolbar.
  • Click the box next to 'Gridlines'.


That's it! Though remember that you did that, if you find it easier to work with the gridlines when you're next creating things. Just tick the box again to put them back.

How Do You Add Gridlines/Cell Borders Inside the Table?

This is done in the same way that we added the outer border. It's simply another option within that pull down menu.
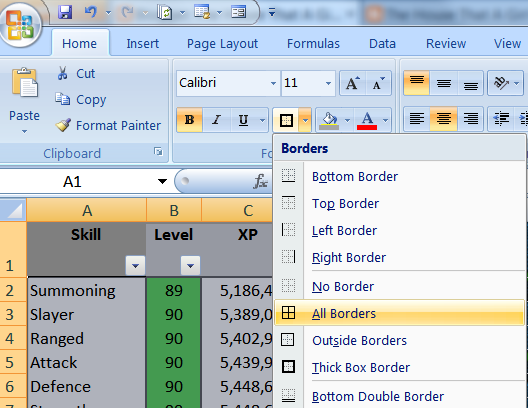
  • Highlight your table.
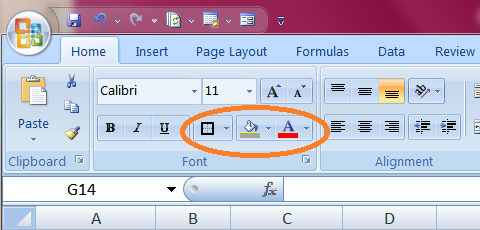
  • Click on the borders button, in the 'font' category of the 'Home' tab.
  • Select 'All Borders' from the pull down menu and click it.


NB This will remove your thick outer borders, if you had those added. Just reinstate them in the same way that you did it originally.

How Do You Move Your Averages Hiscores Chart?

I guided you through creating this table in the first five columns of your worksheet, but it is possible to copy and paste it elsewhere. You just need to do a small amount of adjusting once it's there.
  • Highight all five columns by clicking on A and dragging your mouse to E.
  • Right-click anywhere in the highlighted columns.
  • Chose 'copy' from the pull-down menu.
  • Right-click on the first cell of the area you want to display it.
  • Select 'paste special' from the pull-down menu.
This will produce a table with all of the colouring and formatting, but no data. Don't fret about this. The formulas are all still there, but those in the first three columns are pointing to the wrong place. The act of moving them means that Excel automatically adjusts them, which is sometimes great and sometimes not.


  • Click on the first cell in the 'Skill' column.
  • Paste in this formula: =Data!B2
  • Click on the little square to drag that formula down to the bottom of the table.
  • Click on the first cell in the 'Level' column.
  • Paste in this formula: =Data!C2 and drag that down too.
  • Click on the first cell in the 'XP' column.
  • Paste in this formula: =Data!F2 and drag that down too.

All good! Please note that if you called your data worksheet something else, you need to swap 'Data' in those formulas to the name you called it.

A simple alternative method is to insert columns or rows before your table.
  • Highlight the A column.
  • Right-click anywhere in the highlighted section.
  • Select 'insert' from the pull-down menu.

You just need to repeat that until the table is where you want it to be.


If anyone has any more questions, just comment and I'll do my best to answer them for you.

Part 2: Averages Table in your Runescape Excel Hiscores Tracker

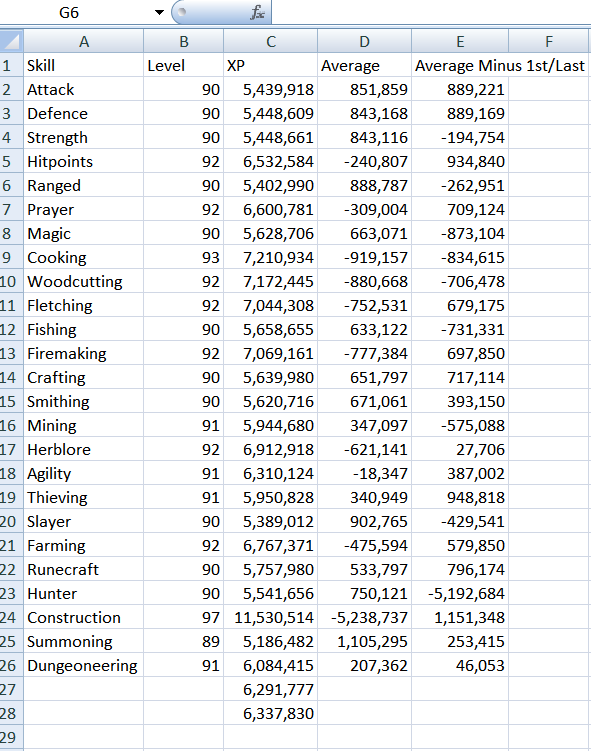
Yesterday I showed you how to grab some data, with which to start creating your Runescape Hiscores Tracker in Microsoft Office Excel. If you missed it, then please check out part one.

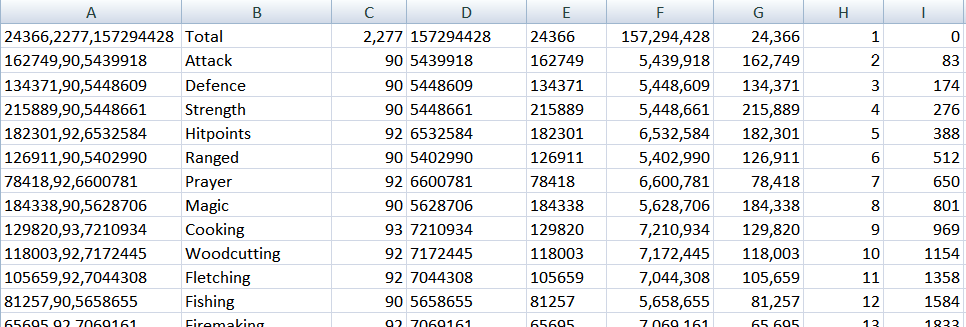
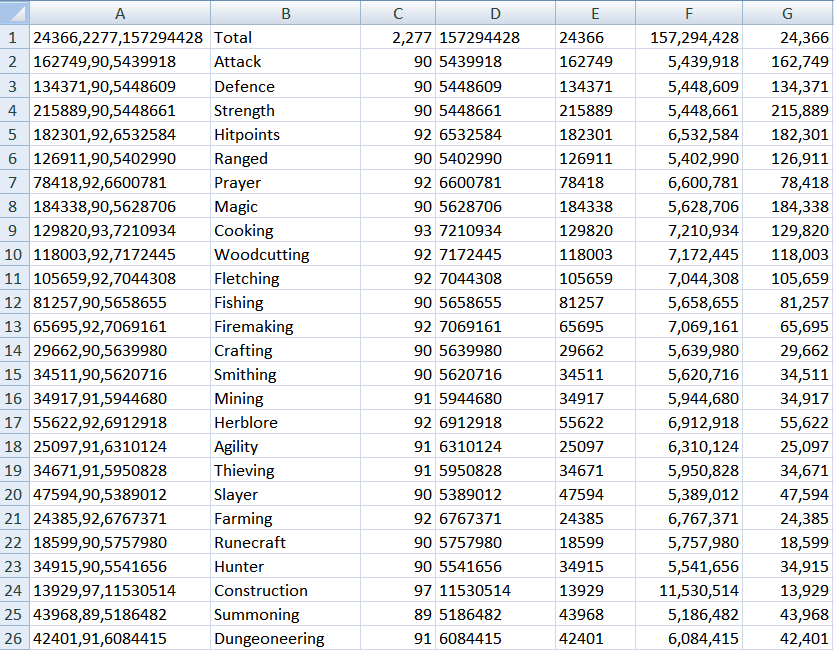
We ended up with a worksheet that looked like this:


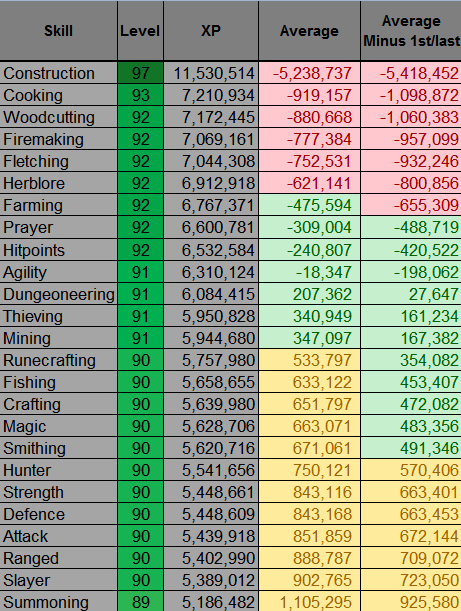
Time to open up your workbook for round two! Today we will be making the same averages table that habitually turns up in screenshots in my Runescape blog.

Runescape Excel Hiscores Tracker: Formatting your Data

While we now have some data, it's going to look messy, unless we format it first. Fortunately, that's really easy to do and takes whole seconds.
  • Left-click on the F, so that the whole column is highlighted.
  • Still holding your left-click down, drag your mouse onto the G. You should have both the F and G columns highlighted now.
  • Right-click anywhere in those columns.
  • Select Format Cells from the menu.
  • Select Number from the category list.
  • Ensure that 'Decimal Places' is set to O and tick the box to use the 1000 separator.
  • Press OK and happy dance. Your columns are now ready to receive some data.
We've had to do that, because it's notoriously difficult to format it later. Obviously this is own personal choice, so if you didn't want the 1000 separator, then don't tick the box. :p
  • In F1, copy and paste this formula: =SUM(D1+0)
  • Select F1, so that the cell is highlighted.
  • Click the tiny square in the right-hand, bottom corner.
  • Drag it down to F26.
  • In G1, copy and paste this formula: =SUM(E1+0)
  • Repeat the steps above to fill in your column down to G26.
  • Save your workbook.
Your worksheet should now look like this:


Chart Time! Hiscores and Averages in Excel

After all this boring data stuff, it's about time you had a chart to show for your trouble. Right now, we have the data to simply display your hiscores and to create a table to calculate your averages.

I'm a player who likes to keep my levels fairly even, so this is a chart that I use a lot. It tells me what needs pushing upwards to get it into the middle. My ideal is to have everything within just a few xp of each other. For those of you less picky, just call it a curiosity.

We're aiming for something that looks like this:


Before heading into this, make a note of what you called the worksheet (or tab) with all of your data on it. I called mine 'Data'. You're going to need to know that for the formulas on the next page.
  • Click the tab entitled 'Sheet2' to open a fresh new worksheet.
  • Right-click the tab to rename it. I've called mine 'Runescape Hiscores'.


  • Click cell A1. Type in a heading like 'Skill'.
  • Click cell A2. Copy and paste this formula: =Data!B2 (NB Data is the name of my worksheet with the data on it. If you chose a different name, then substitute 'data' for your worksheet's name.)
  • Drag the formula down to cell A26.
  • Do the 'cheer' emote, as all of the skills are listed from Attack to Dungeoneering.
  • Click cell B1. Type in a heading like 'Level'.
  • Click cell B2. Copy and paste this formula: =Data!C2
  • Drag the formula down to cell B26.
  • Woot if all of your levels are listed next to the appropriate title.

A note about what you did there, just in case you want to experiment on your own. You've basically typed an address into each cell. =Worksheetname!Cell reference within that worksheet. So =Data!A1 would capture whatever is showing in cell A1, in the Data worksheet. Savvy?
  • Click cell C1. Type in a heading like 'XP'.
  • Click cell C2. Copy and paste this formula: =Data!F2
  • Drag the formula down to cell C26.
  • Click cell D27. Copy and paste this formula: =AVERAGE(C2:C26)
  • Click cell D28. Copy and paste this formula: =AVERAGE(C3:C25)
  • Press return.
  • Feel accomplished.
We're nearly there now. Just a couple more copying and pasting moments.
  • Click cell D1. Type in a heading like 'Average'.
  • Copy the following and paste it into cell D2.

    =D27-C2
    =D27-C3
    =D27-C4
    =D27-C5
    =D27-C6
    =D27-C7
    =D27-C8
    =D27-C9
    =D27-C10
    =D27-C11
    =D27-C12
    =D27-C13
    =D27-C14
    =D27-C15
    =D27-C16
    =D27-C17
    =D27-C18
    =D27-C19
    =D27-C20
    =D27-C21
    =D27-C22
    =D27-C23
    =D27-C24
    =D27-C25
    =D27-C26
  • Click cell E1. Type in a heading like 'Average Minus 1st/Last'.
  • Copy the following and paste it into cell E2.
    =D28-C2
    =D28-C3
    =D28-C4
    =D28-C5
    =D28-C6
    =D28-C7
    =D28-C8
    =D28-C9
    =D28-C10
    =D28-C11
    =D28-C12
    =D28-C13
    =D28-C14
    =D28-C15
    =D28-C16
    =D28-C17
    =D28-C18
    =D28-C19
    =D28-C20
    =D28-C21
    =D28-C22
    =D28-C23
    =D28-C24
    =D28-C25
    =D28-C26
  • Save the workbook.

Happy days? You should have something that looks like this:


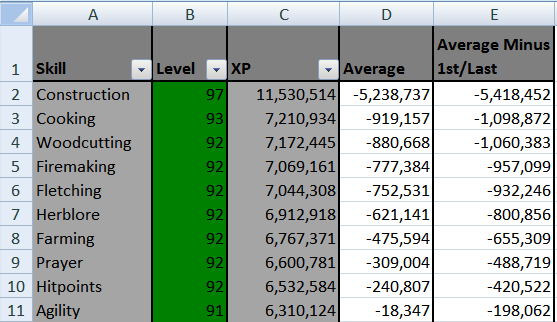
That is basically the same averages chart that I pictured above, but without the pretty colours.

Pimp Your Runescape Hiscores Averages Table

Excel has an array of colours, fonts, clip art and stuff to spice up your charts. I recommend going all hands on imperative with this one, as you're the person who's going to be staring at it from now on. Click buttons and see what you have to create much prettiness. It's all good fun.

Just remember to save after you do stuff. I know from bitter experience how horrible it is to lose hours of work, because you messed up on something experimental.

For those who want a carbon copy of mine, then I'll talk you through it.
  • Click on the 1, so that the top row is highlighted.
  • Select 'B' (bold) from the (Home) format tab above.
  • Right-click anywhere on that row.
  • Select 'format cells' from the menu.
  • Click on the Alignment tab.
  • Tick 'wrap text' from the Text Control section.
  • Click ok.
  • Move your mouse to the bar between the E and F. It will change shape into a kind of cross thingie with arrows.
  • Left-click to drag the column, so that it's wider. Then you can fight 'minus 1st/last' on the same line.
  • If necessary, use the same tactic between the 1 and 2 to make the row smaller.
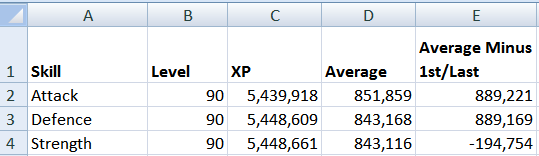
Mine now looks like this:

  • Click on the 27 and drag your mouse to the 28. You should have both rows highlighted.
  • Right-click anywhere in that row.
  • Select 'hide' from the menu.
You only need to do that if you want the average totals to disappear. They're feeding the last two columns, but you'll never need them for anything. They'll continue to work whilst hidden.
  • Click on the A, then drag so that A, B and C columns are highlighted.
  • Click the 'Sort and Filter' tab, which is located on the right-hand side of the 'Home' tab toolbar.
  • Click 'Filter'.
This will add little box arrows to those columns. It allows you to order the information in each column according to preference. If you hate it, just click 'filter' again and they'll go away. For those accomplished with macros, then that's a much neater way to sort your data, so go ahead and add a button. I'm not going to describe that here though.

Warning: Don't try to sort the Average columns. It'll mess up the formulas there and you'll have to return to this guide to paste them all in again. :p

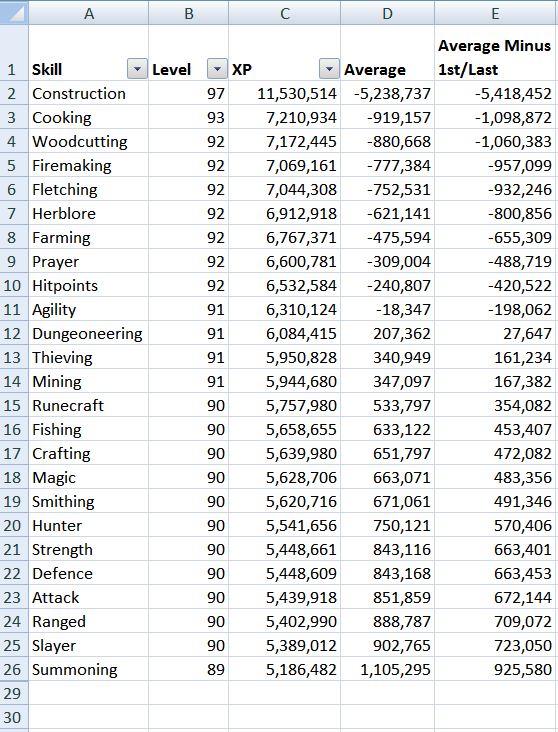
My table now looks like this:


Adding a Splash of Colour to your Runescape Hiscores Averages Table

All of the information is there, but it looks a bit boring. In order to jazz it up, I'm going to use a couple of the functions in the 'Home' tab toolbar.
  • Highlight the entire table. You can do this by clicking on one corner then, with your left-click held down, dragging your mouse diagonally across to the opposite corner.
  • Click the border button, in the 'font' category, on the 'Home' toolbar.
  • From the pull down menu, select a border. I've gone for 'Thick Box Border'.
  • Highlight the five cells that make up your header.
  • Select a border for it, as you did for the whole table. I'm still with 'Thick Box Border'. 
  • Highlight the same five cells again.
  • Click on the paint bucket icon, in the 'font' category, on the toolbar just above.
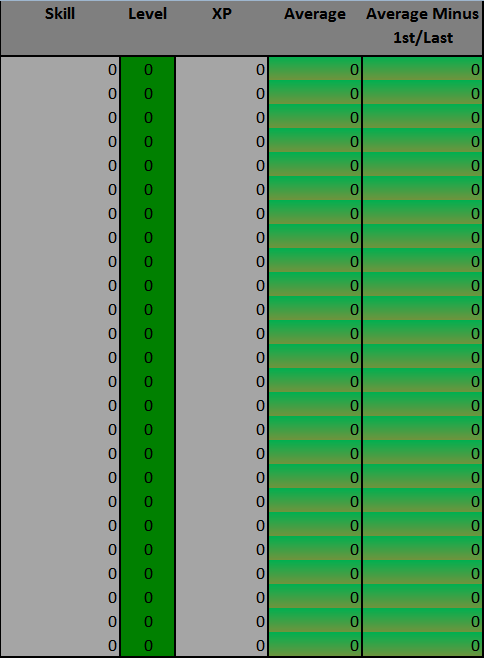
  • Choose your colour. I've gone for dark grey.
  • Highlight the cells with the skills listed.
  • Click on the paint bucket icon and choose your colour. I've gone for light grey.
  • Select a border for it, as you did with the header. I'm with 'Thick Box Border' all the way.
  • Repeat this for the columns displaying the Levels and XP as well. I've chosen green for the levels and the same light grey as above for the XP.

Tidying Up the Header in your Hiscores Averages Table

This looks reasonably brighter, but the header is annoying me. I'm going to reposition the text a bit, so that I can make the columns a bit narrower.
  • Highlight the five header cells.
  • Right-click anywhere in the highlighted cells and select 'format cells'.
  • Select the 'Alignment' tab.
  • Select 'Center' from the pull-down menu under Horizontal.
  • Select 'Top' from the pull-down menu under Vertical.
  • Press OK.
  • Make your columns narrower or wider by moving your cursor to the 'wall' between two letters.
  • Left-click and drag in the direction that you want.
  • Click on the B to highlight the 'Level' column.
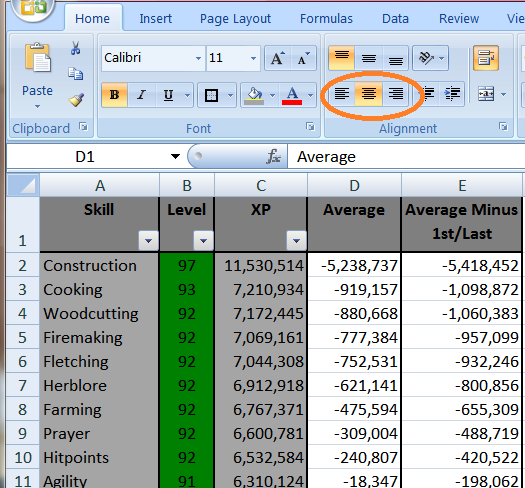
  • Press the 'center' button on the 'Alignment' category of the 'Home' tab toolbar.
  • Applaud at how much neater it all is.


Traffic Light Effect in Colouring the Averages Columns

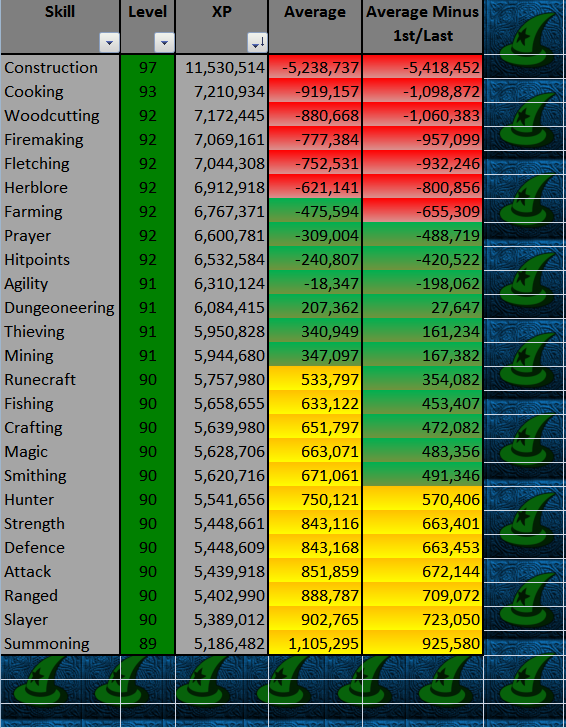
Of course, what everyone comments upon is the triple colour effect that I have decorating my averages columns. It's almost short-hand amongst my friends to ask me what's 'in the green' these days.

This is added using the Conditional Formatting function, which can be found in the 'Home' tab toolbar.
  • Highlight the cells D2 to E26.
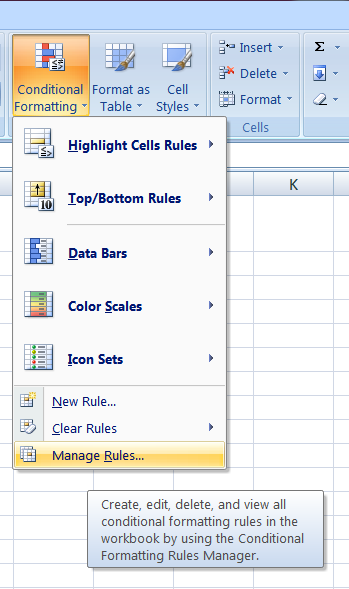
  • Click the Conditional Formatting button and choose 'Manage Rules'.


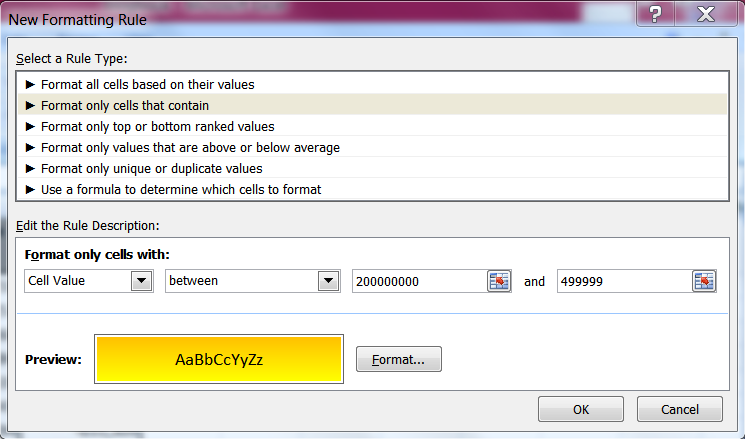
  • Select 'Format only cells that contain'.
  • In the preview, select the format button.
  • Choose a colour for the lower end of your levels. I've clicked on 'fill effects', then chosen two shades of yellow for a gradient two colour effect.
  • Press ok, until you are back at the 'New Formatting Rule' box.
  • Select 'cell value', 'between', '200000000' and '499999', in the pull down menus of the 'Edit Rule Description' section.

Obviously it's up to you what numbers you want to put in there. I'm aiming for the meridian point having a scope of 500,000 xp each way. So my skills only turn green if they're within that 1m range of the middle point. You may want less or more. The 200,000,000 is just a random number to mean infinity. The 499,999 is as far short of the meridan as I want to go.


  • Press OK.
  • Press 'new rule'.
  • Repeat the above process, with different colours (I've gone for two shades of green), adding in the numbers 500000 and -499999.
  • Repeat again with the numbers -500000 and -200000000. (I've gone for two shades of red.)
  • Press apply.
Congratulations! You have a pretty, fully automatic table to track your averages in your Runescape Hiscores!

If you really want it to stand out, you could add a background to the rest of the worksheet. There are two ways of doing this.
  •  Select the Page Layout tab, from the top toolbar.
  • Click on 'Background' in the 'Page Setup' category.
  • Choose a picture from your hard-drive to insert there.
Or
  • Highlight all of the columns and rows around your table.
  • Click on the paint bucket icon, in the 'Home' tab.
  • Fill it with the colour of your choice.
Enjoy your table!


Most of the hard work is done now, in terms of adding data. It's mostly making things from it. Next time, we'll be adding just a bit more data and then we'll look at a chart that calculates how much XP to your next level. Hurrah!